Learnings From Building a Mixed Reality, Room Tracking visionOS App
PUBLISHED MARCH 21, 2025
I just launched my second indie visionOS app: Mirage. Mirage uses visionOS 2.0’s room tracking to reimagine your space with mixed reality visuals. Feel like the times call for a rainstorm in your living room? Mirage can make it happen.
You can check out a demo over here, or here’s the gist of it:
Switch up your place with Mirage
Mirage started out as a quick weekend hackathon project and then languished for several months as I wrapped up client projects and researched advanced automation operations. I resumed development in January, finished in February, and learned many things along the way.
If you’re interested in a grab bag of tips and do’s and do-not-do’s related to mixed reality (and general) visionOS development: Here you go!
Thirteen Takeaways From Building a Room Tracking App
1. Room Tracking is Awesome
I suppose this isn’t that helpful of a takeaway – but I came away amazed by room tracking. visionOS’s ability to quickly and (relatively) accurately give you surfaces that represent your walls and floors seems like very dynamic stuff. Sure, it’s simple – but it’s quick to set up, easy to work with, and it surfaces information that’s very important to people.
Given my years of experimenting with Room Plan and Object Capture, I can’t help but notice that Apple is very interested in our homes – but (at least in my opinion) not in a creepy way. I expect their interest in helping us map, visualize, and personalize our homes in new ways will become increasingly obvious as additional APIs are added in visionOS 3 and beyond. I believe how we interact with our homes is going to change in the near future in exciting ways.
Room tracking is cool. You should check it out.
2. Understand When to Use Plane Tracking vs. Scene Reconstruction
When I was first checking out ARKit’s capabilities on visionOS I quickly glossed over plane detection. It struck me as one of the oldest ARKit capabilities; it was just a port of the functionality announced for iOS with ARKit 1 back in 2017. Now that we had more advanced scene reconstruction I figured I’d leave my toying with plane detection back in 2018 with my early iOS ARKit prototypes.
That was stupid.
Scene reconstruction on visionOS and iOS can tell you whether one specific face of the reconstructed mesh is a table or window or floor. But sometimes you don’t want an uneven, unruly polygonal approximation of a table surface. You’d much prefer a nice, flat rectangle that represents visionOS’s best guess of the table’s location.
In Mirage I didn’t want a patchy, uneven, skewed-angle guess for where a door may be in my surroundings. I wanted a dead-simple plane that I could occlude so people could always “anchor” themselves in their room.
While scene reconstruction may be more advanced and visually impressive than plain, old, boring plane detection – the use case really determines what to use where.
And quite intertwined with those thoughts is the harsh reality that…
3. Plane Detection and Mesh Detection Are Low Fidelity
Plane detection and mesh detection aren’t great in visionOS 2 on the 2024 Vision Pro. They suffice, but it is still early days.
Personally: If I’m using plane detection to utilize a table’s shape for some effect, I’m going to do everything I can to avoid showing the user where visionOS thinks the edges of the table are…because it’s going to be off in a lot of cases. Sometimes it’ll think a table extends further in one direction than it actually does by several inches. Other times it’ll look at a round surface and say “Sweet rectangle you got there.” Other times it’ll look at angled walls, or a space that opens up onto lower floors, or slightly lowered ceilings and say: Nah, I don’t understand that, so instead here’s a mesh that’s totally wrong.
Scene reconstruction is, arguably, worse. What I wanted Mirage to do was to accurately and with high fidelity understand which surfaces in a mesh are walls and make those faces transparent. It did create a mesh with different classifications for different faces – but at a much lower fidelity or resolution than I found acceptable. The low poly, lo-fi reality of meshes generated by today’s hardware yields an unsatisfactory end result.
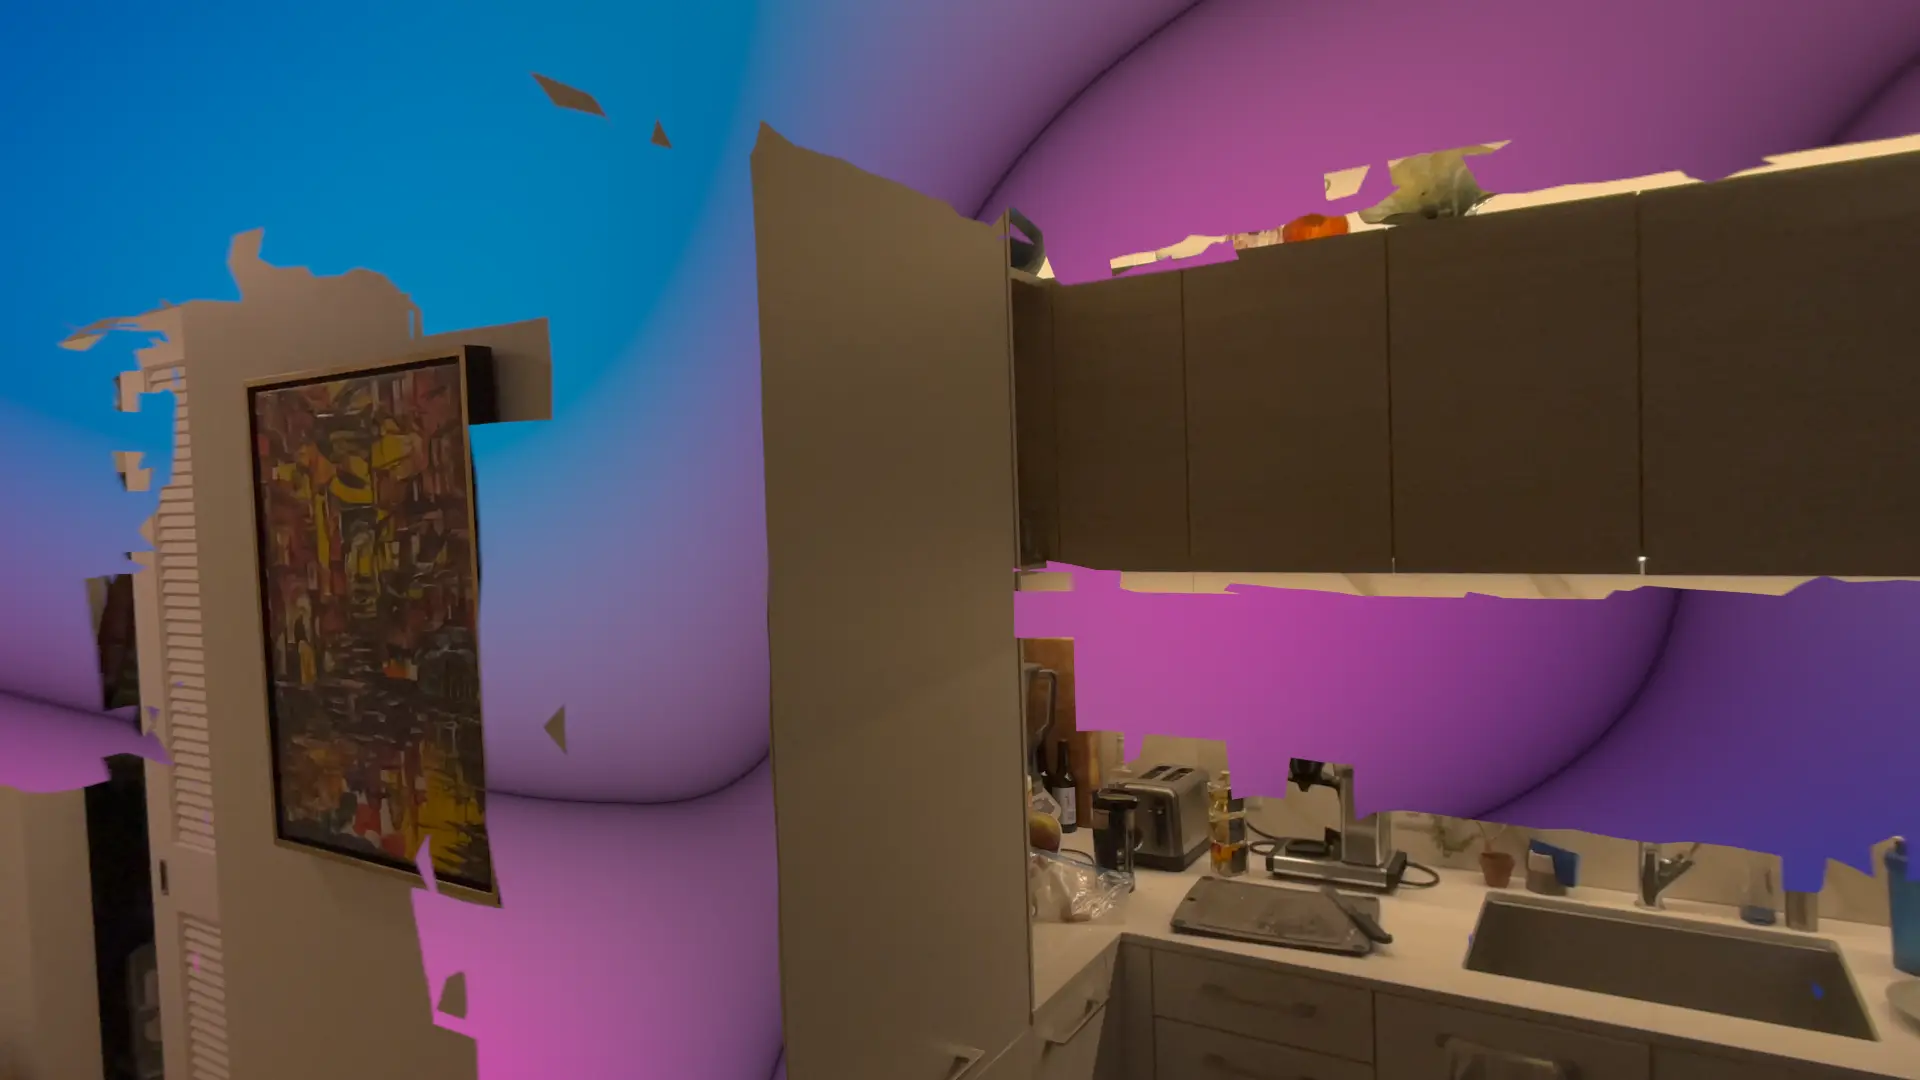
No, thank you
To be clear: There are always ways to improve things. Custom work, on top of the groundwork laid by ARKit, can lead to phenomenal results. But for me, in between client contracts, I’m largely looking to build and launch a product as quickly as possible rather than spend weeks or months on one part of that product.
If I had to place blame, my naive assumption would be to blame the LiDAR sensors and processing power of today’s Vision Pro. I’m guessing the Vision Pro’s LiDAR sensor resolution is higher than the LiDAR sensors in iPhones and iPads (which have had those sensors for ~4 years now) – but I haven’t tested that and they feel quite similar to me.
One of the most frustrating parts of all this (besides not being able to quickly and easily build what I want because the hardware just isn’t there yet), is that people don’t know the limits of spatial computing and today’s sensors. To put it more plainly: users blame developers for something that is a limitation of today’s hardware and today’s visionOS.
I’ve seen this in many 1-star reviews of others’ visionOS apps (and I experienced it many times over the years in my old iOS ARKit apps) – reviews that are to the effect of:
- App doesn’t know where my table ends
- Developer should really fix floor level placement
- App is worthless, developer totally messed up wall detection
To me, this is akin to complaining in 2008 about how an app isn’t retina-resolution – two years before high-dpi screens were introduced in 2010. Or giving an app a bad review in 2016 because it lacked Dark Mode support – three years before iOS added Dark Mode in 2019.
I sound bitter, but years ago I accepted all of the above as coming with the territory of working on something that’s still relatively new. There are decades of history of people speccing out, buying, and using computers and smartphones. Not so for AR headsets.
It’s perfectly reasonable for users to be frustated when their $3,500 face computer doesn’t perfectly understand where their table is due to its mysterious LiDAR sensor, or its two-generation-old processor, or its nascent OS. I get it. We’ll get there.
4. Small Touches, Like Fade-Ins and Fade-Outs, Add a Lot
We’re barely one year into the life of visionOS. Remember what iOS looked like a full four years post-launch in 2011?
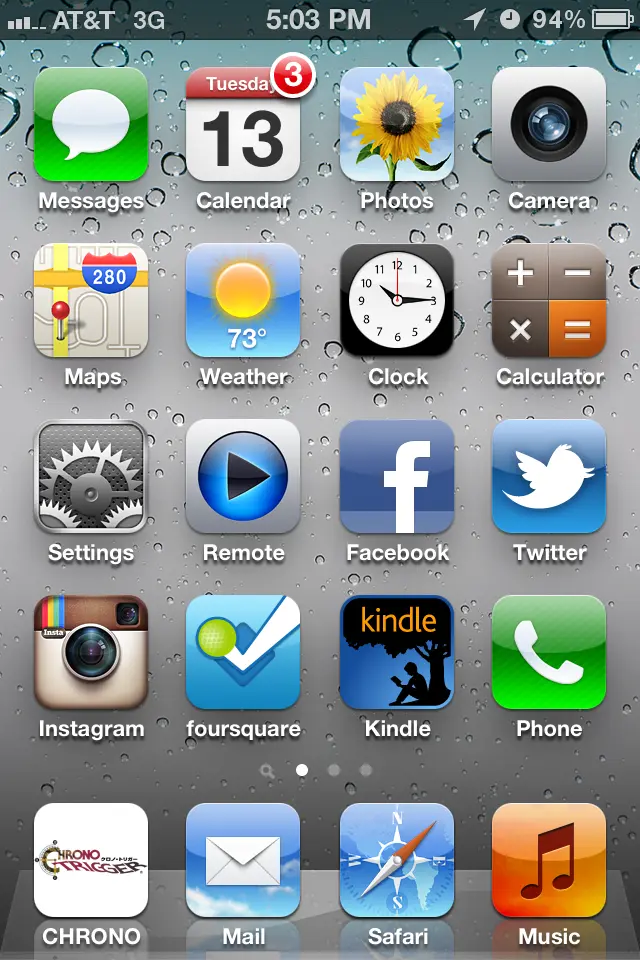
Now I’m gonna put on Super Guitar Bros self-titled album for the millionth time
iOS 5 still had a lot of room to grow and improve and mature, even after it was already clear the OS was changing the world.
iPhone sold 6.1M units in its first year. Vision Pro sold maybe 7-8% that amount in its first year. And visionOS doesn’t have the momentum iOS had in 2008/2009; momentum that afforded iOS lots of interest, users, developers, apps, experiments, competitors, and more. All that action meant new UI and UX paradigms were tested, formed, and discovered.
We may be years away from that happening on visionOS – but that doesn’t mean we can’t take very basic learnings from prior platforms and adapt them for visionOS right now.
Most of my personal projects are lacking in UX polish because I have an idea and I want to get it out as quickly as possible. Animations, loving touches, and non-laughable “design” can come later…I just want to get the core thing out there. Now.
But this is assuredly too hasty.
Mirage transitions the user between immersive spaces. One way to do that is the lazy way: Instantly drop people into a new space with no warning, warmup, or transition.
Another way to do that is a “better,” albeit longer-to-develop, way: Fade things out and then fade things in.
I’m mostly trying to convince my future self for my next project: Take an extra few days to improve the UX with obvious stuff that designers have implemented for decades like smooth transitions, animations, and feedback. A bunch of small touches, even if they take a long time to implement, add up to make a huge difference.
5. Keep the Number of Particles and Particle Emitters Low
We all know this. You know this. I “knew” this.
But…more is always better, right?
At some point I was going to put particle emitters everywhere. There were going to be rain drop particle emitters on the ground, on your tables, on your couch, and of course there had to be some on your hands. And once all those emitters are there, then I’d also need to occlude beneath surfaces. Otherwise the fake, virtual rain drops would appear where they realistically couldn’t, like under a table that should be providing shelter.
I’ll need lots of particles, and lots of emitters, and lots of logic to prevent drops from appearing in certain places, and, and…
But all that’s expensive. And as we already established: The planes and meshes currently detected are low fidelity. Adding a particle emitter to your table would not only be resource-heavy, it wouldn’t even match the intended surface well enough to yield a satisfying effect.
I resigned myself to just cranking up the number of particles to the max. And then I realized I was killing the framerate. Then I resigned myself to what I knew from the beginning: I had to use orders of magnitude fewer particles than I wanted and an order of magnitude fewer emitters than I wanted.
It hurt my soul when multiple early testers held out their hands to see if the rain drops collided with their palms.
I could do that. I still think I should have done that.
Maybe later.
6. Semi-Transparency Kills the Device
Tremendously oversimplifying (and probably getting a lot wrong, I’m not a render pipeline guy): When visionOS is determining what to draw ninety times a second to its 23 million pixels, it would prefer every virtual thing it’s drawing to be completely opaque. An opaque, red sphere means visionOS knows that area of the image is red, it draws a red pixel, and it moves on.
But if materials or objects are partially transparent, visionOS needs to think a lot harder.
If a semi-translucent prism is being drawn: Just how translucent are we talking? What color is the semi-translucent material? What’s behind that material? Because whatever’s behind the prism is now going to be showing through to some degree – but to what degree? Are there any portions of the object where the user is looking through two semi-translucent surfaces? Three? And how does light affect this material?
Semi-transparent materials mean a lot more work for the device. If a pixel drawing an opaque material is drawn once, then a pixel rendering a see-through spot is going to be processed at least twice. The first pass understands what’s behind the material. That first pass influences the second pass, which renders the see-through material itself.
If your semi-translucent object is small, you can get away with it. After all, the entire aesthetic of visionOS is frosted glass.
However, your Vision Pro will punish you with angry, uncomfortable heat and low framerates if you try to fill too much of the field of view (or, all of it, as I attempted) with complex, partially-transparent objects.
I wouldn’t avoid semi-opaque objects completely – I’d recommend starting with too much and then paring back.
Or: Maybe just learn Metal. Metal oftentimes unlocks wizardry beyond the reach of mere mortals like myself.
7. Use RealityKit Trace
Very much related to the last two items – if you want to really dive into the details, get technical, and thoroughly understand how changes to your app affect performance and the user’s experience: What you need is RealityKit Trace. RealityKit Trace is an Instruments profiling template that gives you more information than you could ever possibly want on every tiny little thing related to your app’s performance (you can launch Instruments from Xcode with: ⌘ i).

RealityKit Trace can fulfill all your wildest profiling dreams
Frame times. Power impact. CPU usage. Bottlenecks. RealityKit Trace can be very useful; if you’re interested I recommend checking out this WWDC session.
But extracting useful information and potential remedies to test based on RealityKit Trace and its data is not always straightforward. If only there were a better way…
8. Use the “Is My Vision Pro Melting” Test
The first version of one of my Shader Graph Materials used the Fractal Noise 3D node. It didn’t need to. I didn’t know that. My Vision Pro started melting when I tried to run that unoptimized, prototype, spaghetti-shader-graph material.
How did I know it was melting?
- The fans turned on (not super uncommon, but not that common either)
- When I moved my head from side to side the Vision Pro could not render the immersive environment and its materials quick enough – this results in a lag where the you can see the unmodified passthrough video for a split second at the edges of your field of view before visionOS “catches up” and draws the immersive space
- Screen Recording absolutely doesn’t work – when it’s really melting you’ll record at a blazing 0.2 FPS
I eventually relied on this “Is My Vision Pro Melting” test, rather than RealityKit Trace, as I tweaked my shaders. Long story short: The Noise 3D node is a lot easier on the device.
9. Use Geometry Modifiers
There was a particularly annoying problem that I spent way too long on: I’m often using multiple instances of the surfaces detected by room tracking and those surfaces will have different materials but occupy the same spot. Renderers generally don’t like when you tell them to draw multiple things in the exact same position – visionOS’s way of letting you know it doesn’t like to draw two walls in identical locations is a seizure-inducing strobing between the two materials.
Ok – I needed to move the walls. Just a little bit.
But…how? Which way? If you live in a simple, six-sided box of a room – the answer is pretty easy. You can move things just a tiny bit “out” or a tiny bit “in.” But I don’t think many people actually live in boxes. Rooms have branching dens, recessed alcoves, hallways, and other features. If you stand in one position of a complex room it becomes less obvious what the direction “out” means for all the walls of the room.
Perhaps most importantly, we just discussed how we don’t want our shifted walls to occupy the same space because seizures are bad – so we’ll want to shift our walls such that they don’t intersect.
Imagine you’re in the upper-left corner of a U-shaped room. Mathematically, how do you consistently and without forming intersections move all of the room’s walls “out” when that means moving some of its walls closer to its centroid?
I know there is a simple answer out there that someone probably figured out centuries ago and that I learned decades ago…but I forgot. I was so ashamed.
Then I grabbed a Geometry Modifier node, normalized some normals, and told Reality Composer Pro to shift the objects’ vertices 0.01 millimeters along the x and z axes.
I’m still ashamed…but at least that’s done.
10. Not All Audio Needs to Be Spatial
visionOS makes it very easy to spatialize audio. With minimal effort you can take some random audio track, place it in a scene in Reality Composer Pro, and instantly get natural distance attenuation and directional audio. Different environments also have different audio profiles – I lack the aural vocabulary to articulate exactly what’s happening, but FaceTime audio and reverberations are processed differently when you’re fully immersed in the Mount Hood environment versus sitting in the mixed reality version of your living room.
Apple wants us to use spatial audio as much as possible on visionOS…but it doesn’t make sense to use spatial audio everywhere.
For my launch mirages I trialed some free, cc0 audio tracks from Pixabay played via a SpatialAudioComponent and then an AmbientAudioComponent, but neither of those was “right.”
For launch I just want a single track playing, and if the mirages encompass the user then having the audio falloff of a SpatialAudioComponent as the user moved away from a specific coordinate doesn’t make sense. Neither did I want the audio directionality conveyed by an AmbientAudioComponent – for an enveloping scene with no need for specific sounds to be attached to a specific direction, it felt wrong to have the audio channels (and their respective, distinct sounds) adjust to my head’s orientation.
I just wanted my simple stereo tracks to play with no adjustments for position within the scene nor orientation within the scene. ChannelAudioComponent does just that.
Maybe down the line I’ll additional audio sources (spatial and ambient) to build towards more dynamic, convincing mirages – but neither of those are the right fit for this initial release.
11. Mind Your Color Spaces
You’re probably going to need some skyboxes if you’re dabbling in visionOS immersive spaces. If you know all about different color spaces – you’re way ahead of me.
My eyes glaze over every two years when I have to choose a specific color space to use for a specific application. I usually fervently try out the different color space options I’m presented with, see what “looks about right”, and then I move on.
You will probably want some HDRI files for your immersive space skyboxes. And those fancy HDRI images will probably come in .exr format, which has Extended Dynamic Range.
It’ll look washed out if you try to use it as-is. What worked for me to convert the files I used to what “looks about right”:
- Go to Poly Haven
- Download the HDRI you like
- Open it up in macOS’s Preview app
- Export the image as an 8-bit
.png - Install Homebrew
- Install imagemagick from macOS’s Terminal app using:
brew install imagemagick - Convert the image to SDR (Standard Dynamic Range) and compress the exported
.pngusing something along the lines of:
#!/bin/bash
script_dir="$( cd "$( dirname "${BASH_SOURCE[0]}" )" && pwd )"

for file in "$script_dir"/*.{png,exr,hdr}; do
   [ -f "$file" ] || continue

   filename=$(basename "$file")
   extension="${filename##*.}"
   output="${file%.*}_compressed.png"

   if [ "$extension" = "exr" ] || [ "$extension" = "hdr" ]; then
       magick "$file" -colorspace sRGB -define png:compression-level=9 "$output"
   else
       magick "$file" -strip -colorspace sRGB -define png:compression-level=9 "$output"
   fi
   echo "Processed: $output"
done
I’ve yet to dive into anything related to visionOS’s powerful lighting capabilities, so the above is solely a potential place to start – you can only get better from there!
12. SwiftUI Previews Don’t Like MeshResource AttributedString Extrusions
RealityKit just got some fun text extrusion methods in iOS 18 and visionOS 2, like this one. But that doesn’t mean Xcode and SwiftUI Previews are willing to play along.
Don’t depend on SwiftUI Previews for viewing real-time adjustments to things like chamferRadius – I had to clean the build folder (⇧ ⌘ k) and refresh the Canvas (⌥ ⌘ p) to force Xcode 16.2 to display any changes.
13. Probably Don’t Delay Your Launch to Maybe, Possibly, Hopefully Get Featured by Apple
A bunch of the apps I’ve developed have been featured in the App Store over the years, usually on some small niche list multiple levels deep in a category. Typically the process was very opaque: I’d release an app and then a week later I’d discover Apple had slapped it on some list of augmented reality apps. Or, they’d feature it on a list in some specific African country’s App Store and I wouldn’t find out until years later when perusing some App Store Optimization product.
Apple recently made the process just barely less opaque by allowing developers to nominate their apps for featuring. The caveat there is you need to give Apple at least three weeks’ heads-up and nominate your app weeks or months ahead of launch.
Usually when I’m wrapping up a personal project I’m launching to the App Store, I’ve burnt myself out in a mad rush to get an acceptably buggy first version live and on people’s devices. Delaying that launch a further three weeks, which is longer than the time I took to develop a few apps, sounds like torture. But I masochistically assented and nominated Mirage for a feature.
Since I was already done with the app, the “launch” date I set for three weeks out was a made up milestone to test this newish process. I suppose a better-organized team or dev would submit for nomination in the midst of development, but I figured Apple would want to see the actual app rather than just a vague description of an app or some early test footage.
Will Mirage be featured on launch day? I guess not; I didn’t hear anything from Apple.
App Store features can still make or break an app…but I wouldn’t personally recommend other indie devs to nominate their apps, cross their fingers, and wait – as I did. Plan better than I did, build a better app than I did, or write a better pitch than I did.
Or don’t bother with nominations. From here on out I’ll just be launching as I always used to: When it’s ready, it’s submitted, and it’s on the App Store hours later.
If there’s any value in what I’m building, people (or Apple) will find it eventually.
Want my help to build something in this space? Let’s talk.
Got it! I’ll reply soon.